
Keyence VT3-Q5TW Touch Panel Front Overlay Repair
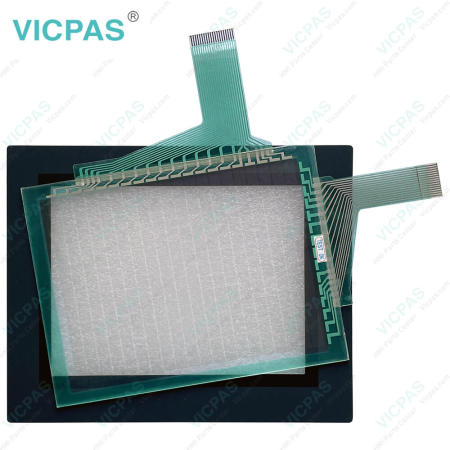
Keyence VT3 VT3-Q5TW Front Overlay Touch Panel Repair Replacement
Order each part separately is available

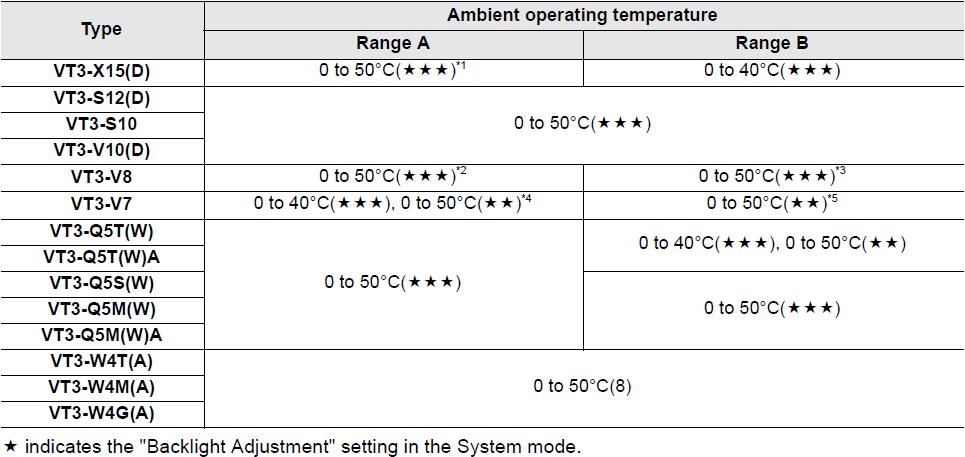
Ambient temperature/humidity precautions
Pay attention to the following points when installing the VT3-Q5TW Protective Film Touchscreen VT3 inside a control panel.
• When the ambient temperature is higher than 40°C, please use it at a maximum absolute humidity of 85% RH at 40°C.
• Do not install the VT3-Q5TW Front Overlay Touch Panel VT3 in a location where the ambient temperature exceeds the 0 to 50°C, or the ambient humidity exceeds the 35 to 85% RH range.
• If the ambient temperature exceeds the above range, install a forced air cooling fan or air conditioner to keep the ambient temperature within this range.
• Allow as much space as possible between the VT3-Q5TW HMI Panel Glass Protective Film VT3 and surrounding structures and other components to improve maintainability, operability and ventilation.
• Do not mount the VT3-Q5TW Touch Digitizer Overlay VT3 directly above equipment (e.g. heaters, transformers, inverters and equipment with large resistance) that generate lots of heat.
• Do not use PORT1 (USB) in locations that are subject to vibration or impact. The USB connector is not provided with a locking function, so the USB cable may become loose or disconnected, and disrupt communications.
Specifications:
The table below describes the parameters of the Keyence VT3 VT3-Q5TW Touch Digitizer Protective Film HMI Parts.
| Cooling Method: | Natural air circulation |
| Backlight: | LED Back Light |
| Brand: | Keyence |
| Product Line: | Keyence VT3 |
| Touch Size: | 5" |
| Display Colors: | 32,768 Colors |
| Display Type: | TFT LCD |
| Operation Temp.: | 0 °C ~ 50 °C |
| Resolution: | 320 x 240 pixels |
| Warranty: | 12-Month Warranty |
Related Keyence VT3 Series Part No. :
| Keyence VT3 HMI | Description | Inventory status |
| VT3-V7R | Keyence VT3 Series Touch Screen Front Overlay Repair | In Stock |
| VT3-V8 | Keyence VT3 Series Protective Film Touch Panel Replacement | Available Now |
| VT3-V10 | Keyence VT3 Series Touch Digitizer Front Overlay Repair | In Stock |
| VT3-V10D | Keyence VT3 Series Protective Film HMI Touch Screen Replacement | In Stock |
| VT3-W4G | Keyence VT3 Series Front Overlay HMI Panel Glass Repair | Available Now |
| VT3-W4GA | Keyence VT3 Series Touch Membrane Protective Film Replacement | In Stock |
| VT3-W4M | Keyence VT3 Series Touchscreen Glass Front Overlay Repair | Available Now |
| VT3-W4MA | Keyence VT3 Series Protective Film Touch Panel Replacement | In Stock |
| VT3-W4T | Keyence VT3 Series Front Overlay HMI Touch Glass Repair | Available Now |
| VT3-W4TA | Keyence VT3 Series Touch Screen Protective Film Replacement | In Stock |
| VT3-X15 | Keyence VT3 Series Front Overlay Touch Digitizer Repair | In Stock |
| VT3-X15D | Keyence VT3 Series Protective Film Touch Membrane Replacement | In Stock |
| Keyence VT3 Series | Description | Inventory status |
Keyence VT3 Series HMI Manuals PDF Download:
FAQ:
Question: What determines the mounting angle?
Answer:
Mounting angle depends on ambient temperature and Back Light adjustment. Adjust the mounting angle to suit the mounting circumstances.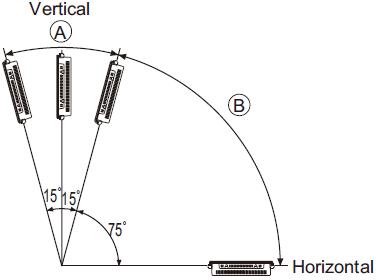
Question: How to mount the front side of the VT3 Series?
Answer:
1. Cut open a mounting space at the size shown below for fitting the VT3 into.
2. Insert the VT3 into the opening of the industrial control panel for mounting.
3. Fix the VT3 onto the panel using the mounting fixtures. Fixtures are mounted on the sides of the VT3 Series.
4. Tighten the screws on the mounting fixtures.
Common misspellings:
T3-Q5TWVTT3-Q5TW
TV3-Q5TW
VT3-5QTW
VT3-Q5WT
- Loading...


- Phone
- *Title
- *Content
 Fast Quote
 Fast Quote
 Worldwide Shipping
 12 Months Warranty
 Customize Service
- Phone
- *Title
- *Content
