
GLC150-BG41-DTC-24V GLC150-BG41-DTK-24V Touch Screen Film

Proface GLC GLC150-BG41-DTC-24V GLC150-BG41-DTK-24V Front Overlay Touch Panel Repair
Order each part separately is available

Periodic Check Points
To keep your GLC GLC150-BG41-DTC-24V GLC150-BG41-DTK-24V HMI Panel Glass Front Overlay unit in its best condition, inspect the following points periodically.
Related Items
• Are all power cords and cables connected properly? Have any become loose?
• Are all mounting brackets holding the GLC150-BG41-DTC-24V GLC150-BG41-DTK-24V Protective Film Touch Screen Monitor unit securely?
• Are there any scratches or traces of dirt on the installation gasket?
GLC Operation Environment
• Is the operating temperature within the allowable range (0° C to 50° C)?
• Is the operating humidity within the specified range (10%RH to 90%RH, dry bulb temperature of 39° C or less)?
• Is the operating atmosphere free of corrosive gasses?
Electrical Specifications
• Is the input voltage (DC 19.2V to DC 28.8V) appropriate?
VICPAS supply Pro-face GLC Series GLC150-BG41-DTC-24V GLC150-BG41-DTK-24V Protective Film and Touch Screen Panel with 365 days warranty and support Urgent Worldwide Shipping.
Specifications:
The table below describes the parameters of the Proface GLC GLC150-BG41-DTC-24V GLC150-BG41-DTK-24V Touch Screen Monitor Front Overlay HMI Machine.
| Ambient Humidity: | 10 to 90%RH (no condensation) |
| Allowable Voltage Drop: | 10 ms or less |
| Display Size: | 5.7 inch |
| Product Line: | Proface GLC |
| Rated Voltage: | DC20.4V to DC28.8V |
| Brand: | Proface |
| Display Resolution: | 320 x 240 pixels |
| Power Supply: | 24 V DC |
| Storage Temperature: | -20 to 60 degrees Celsius |
| Warranty: | 365 Days |
Related Proface GLC Series HMI Part No. :
| Pro-face GLC | Description | Inventory status |
| GLC150-BG41-ADC-24V | Proface GLC Protective Film Touch Screen Replacement | In Stock |
| GLC150-BG41-ADK-24V | Proface GLC Touch Panel Protective Film Repair | Available Now |
| GLC150-BG41-ADPC-24V | Proface GLC Touchscreen Protective Film Repair | In Stock |
| GLC150-BG41-ADPK-24V | Proface GLC HMI Protective Film Touch Screen Glass | Available Now |
| GLC150-BG41-ADTC-24V | Proface GLC Touch Screen Panel Front Overlay Repair | In Stock |
| GLC150-BG41-ADTK-24V | Pro-face GLC Front Overlay Touch Membrane | In Stock |
| GLC150-BG41-DPC-24V | Proface GLC Touch Glass Front Overlay Repair | In Stock |
| GLC150-BG41-DPK-24V | Proface GLC Touch Digitizer Glass Overlay Repair | Available Now |
| GLC150-BG41-DTC-24V | Pro-face GLC HMI Panel Glass Protective Film Repair | Available Now |
| GLC150-BG41-DTK-24V | Proface GLC Touch Screen Monitor Front Overlay | In Stock |
| GLC150-BG41-FLEX-24V | Proface GLC Front Overlay MMI Touch Screen Replacement | In Stock |
| Proface GLC | Description | Inventory status |
Proface GLC Series HMI Manuals PDF Download:
FAQ:
Question: How to replace the GLC150-BG41-DTC-24V GLC150-BG41-DTK-24V backlight?
Answer:
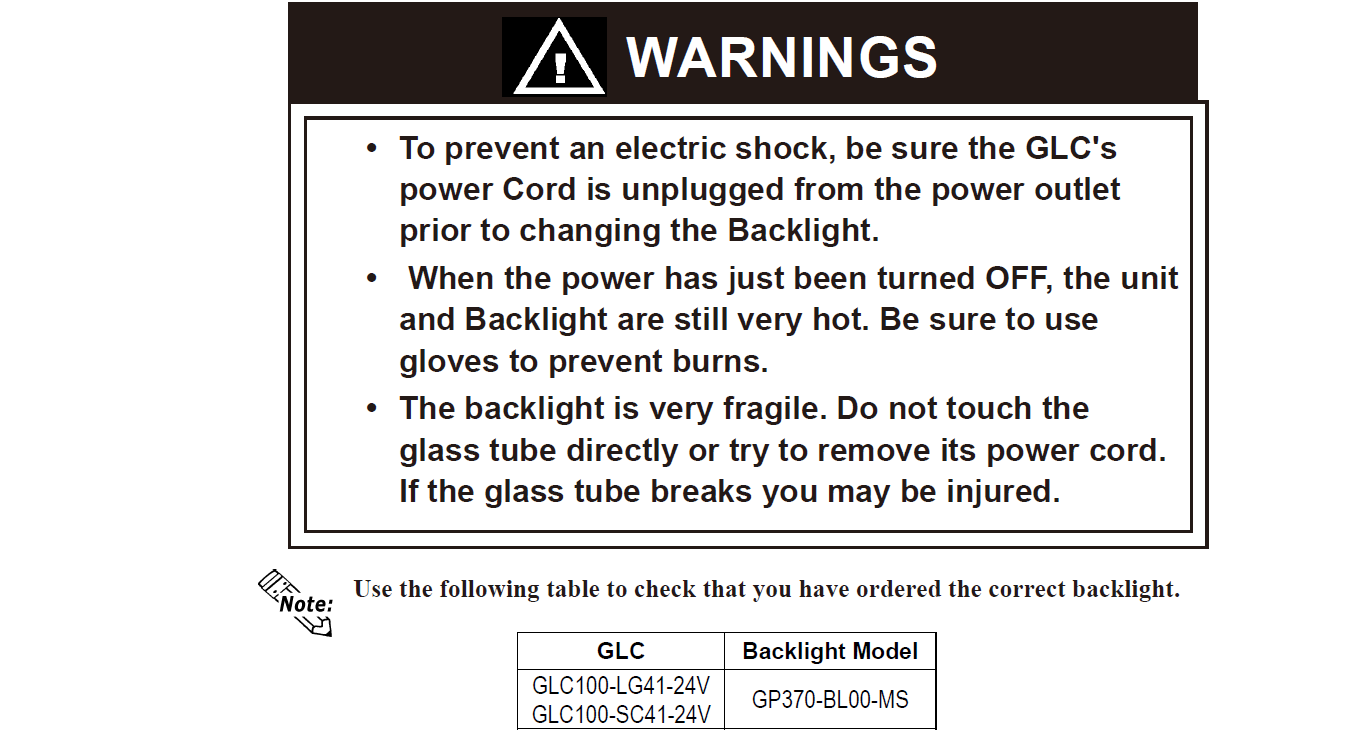
Use the following steps to change the Backlight. Be sure to use gloves.
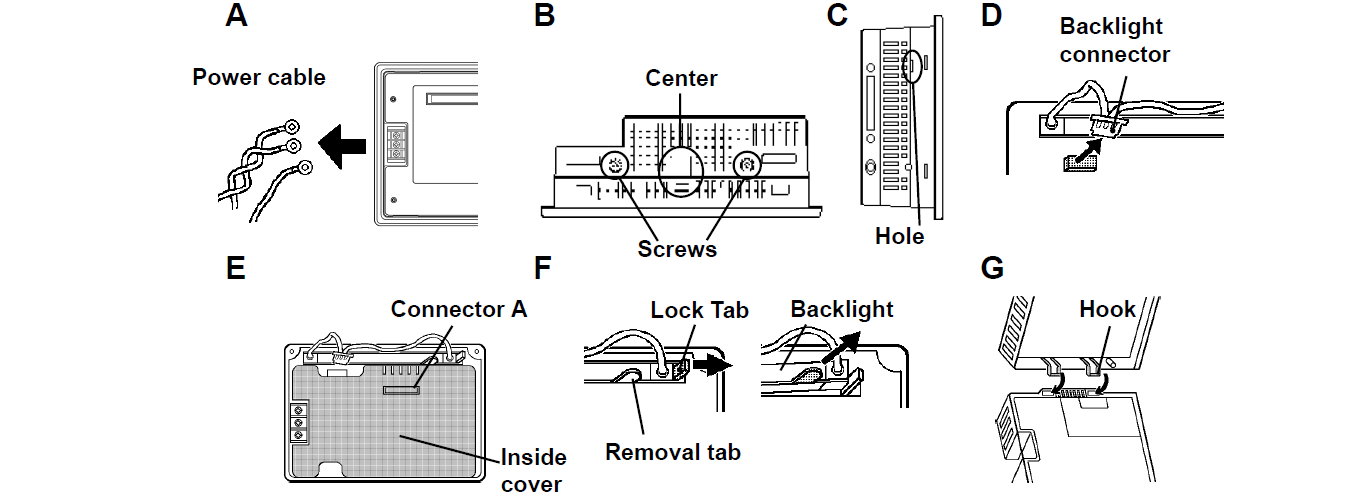
1) Unplug the GLC's power cord from the power supply. Then, remove the GLC's power cord terminals from the power terminal block. (Fig. A)
2) Unscrew the GLC's two (2) top face attachment screws. (Fig. B)
3) Turn the unit so the display surface is facing down. At this time, be sure not to scratch or damage the display surface.
4) Insert a screwdriver into the hole located on the GLC unit's side face to open the case. (Fig. C)
5) Open the GLC150-BG41-DTC-24V GLC150-BG41-DTK-24V Touchscreen Panel Front Overlay unit and detach the backlight connector (Fig. D) At this time, do not remove the inside cover. (Fig. E)
6) Push the backlight's Lock Tab to the right to free the backlight, then pull it upwards and out of the GLC150-BG41-DTC-24V GLC150-BG41-DTK-24V Touch Screen Monitor Protective Film unit. (Fig. F)

8. Insert the new backlight and slide it into its slot until the Lock Tab can be clicked into place, and attach the new backlight's Power Connector to the inverter board.
9. To replace the GLC's rear cover, insert the cover's guide tabs into the case's guide slots and close the cover. Be sure that the Rear Cover Connector and the Front Unit Connector are correctly aligned. (Fig. G)
Common Misspellings:
GLC150-BG41-DTC-24V GLC10-BG41-DTK-24VGLC150-B41-DTC-24V GLC150-BG41-DTK-24V
GLC150-BG41-DTC-24V GLC150-BG41-TDK-24V
GLC150-BG41-DTC-24V GLC150-BG41-DTK-Z4V
GLC150-BG411-DTC-24V GLC150-BG41-DTK-24V
- Loading...


- Phone
- *Title
- *Content
 Fast Quote
 Fast Quote
 Worldwide Shipping
 12 Months Warranty
 Customize Service
- Phone
- *Title
- *Content
