
IPC477E PRO 6AV7255-6HA00-0SE0 Touch Digitizer Glass

| Share | |
|---|---|
| Categories | SIMATIC IPC 477 |
| Brand | VICPAS |
| Model | 6AV7255-6HA00-0SE0 |
| Touch screen panel type | Capacitive touch screen |
| Size | 15.6 inch |
| Brand | Siemens |
| Warranty | 365 Days |
| Product Number | 6AV7255-6HA00-0SE0 |
| Product Line | SIMATIC IPC477E PRO |
| FOB port | Guangzhou, Shenzhen, Hongkong |
| Terms of Payment | Western Union, T/T, PayPal, Credit Card |
SIMATIC IPC477E PRO 6AV7 255-6HA00-0SE0 Touch Screen Panel Replacement Repair

The SIMATIC IPC477E PRO 6AV72556HA000SE0 Touch Digitizer HMI stands out as an exceptional industrial Human-Machine Interface (HMI) solution meticulously crafted to cater to the diverse needs of customers in industrial automation. Seamlessly integrating robust industrial computing with an intuitive interface, it empowers users to effortlessly oversee and manage production processes with precision. What sets it apart is its remarkable adaptability and scalability, allowing for tailor-made configurations to suit the unique demands of various industrial settings.
Renowned for its superior performance and steadfast operation, the SIMATIC IPC477E PRO 6AV7255-6HA00-0SE0 touchscreen HMI thrives even in the harshest industrial conditions. Its formidable processing prowess and streamlined data transmission capabilities ensure swift and accurate access to production data for instantaneous analysis and informed decision-making. Furthermore, its rugged construction guarantees prolonged reliability, minimizing maintenance expenditures and downtime, thus furnishing customers with a dependable assurance of heightened production efficiency.
In essence, the SIMATIC IIPC477E PRO 6AV7 255-6HA00-0SE0 touch screen panel HMI transcends the realm of mere industrial Human-Machine Interface devices, embodying a pinnacle of customer-centric innovation. By harmonizing cutting-edge technology with user-centric design, it delivers to customers solutions that are not only dependable, flexible, and efficient but also resonate deeply with their operational needs and aspirations, facilitating the optimization and elevation of their production processes.
VICPAS supplies 6AV7255-6HA00-0SE0 touch panel glass with VICPAS 365 days warranty and supports Urgent Worldwide Shipping.
Specifications:
The table below describes the parameters of the Siemens IPC477E PRO 6AV72556HA000SE0 Touch Membrane Parts.
| Part Number: | 6AV7255-6HA00-0SE0 |
| Size: | 15 inches |
| Pitch: | 0.5 mm |
| Warranty: | 365 days Warranty |
| Touch Technology: | Capacitive |
| Resolution: | 1366 x 768 pixels |
| Design of Display: | 15" TFT multi-touch |
| Response time: | ≤5ms |
| Operation Temperature: | -10~+60°C |
| Storage Temperature: | -20~+70°C |
Related SIMATIC IPC477E PRO HMI Part No. :
| SIEMENS IPC477E PRO | Description | Inventory status |
| 6AV7251-1DA55-0DA0 | SIMATIC IPC477E PRO Series Touch Screen Monitor | In Stock |
| 6AV7251-1NA55-0DA0 | SIEMENS IPC477E PRO Series MMI Touch Screen Repair | Available Now |
| 6AV7251-3BA01-0DA0 | SIMATIC IPC477E PRO Series Touch Digitizer Replacement | In Stock |
| 6AV7251-3BA04-0FA0 | SIMATIC IPC477E PRO Series Touch Screen Replacement | In Stock |
| 6AV7251-3CA04-0FA0 | SIMATIC IPC477E PRO Series Touch Panel Replacement | Available Now |
| 6AV7251-3CA34-0FA0 | SIEMENS IPC477E PRO Series Touch Digitizer Glass Repair | In Stock |
| 6AV7251-3CB00-0FA0 | SIMATIC IPC477E PRO Series Touch Screen Glass Repair | Available Now |
| 6AV7251-3CB05-0FA0 | SIMATIC IPC477E PRO Series Touch Screen Panel Replacement | In Stock |
| 6AV7251-3DA05-0DA0 | SIEMENS IPC477E PRO Series Touch Membrane Repair Replacement | In Stock |
| 6AV7251-5BB05-0DA0 | SIMATIC IPC477E PRO Series Touch Glass Replacement | In Stock |
| 6AV7251-5BC30-0GA0 | SIEMENS IPC477E PRO Series Touch Digitizer Glass Repair | Available Now |
| 6AV7251-5CC04-0FA0 | SIMATIC IPC477E PRO Series HMI Panel Glass Repair | Available Now |
| 6AV7251-5DB35-0DA0 | SIMATIC IPC477E PRO Series Touch Screen Monitor | In Stock |
| 6AV7255-6HA00-0SE0 | SIEMENS IPC477E PRO Series MMI Touch Screen Repair | Available Now |
| SIMATIC IPC477E PRO | Description | Inventory status |
SIMATIC IPC477E PRO Series Manuals PDF Download:
FAQ:
Question: What is the 6AV7 255-6HA00-0SE0 HMI parts Touch Screen Panel Glass price?
Answer: Submit a fast quote, send VICPAS an email for best price.
Question: How to mount the device?
Answer:
Prepared for support arm or stand without extension elements (flange on top)
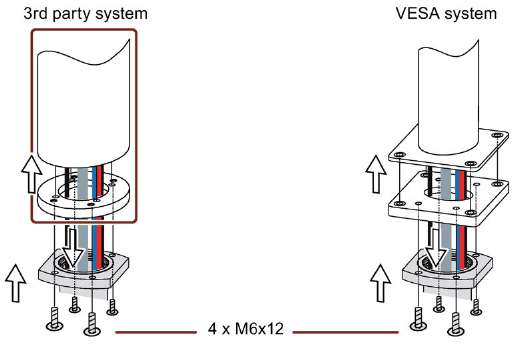
1. If an adapter plate for the Siemens base adapter is included in your support arm system, attach the adapter plate to the support arm with 4 M6x12 screws. Pay attention to the torque that is specified for the support arm.
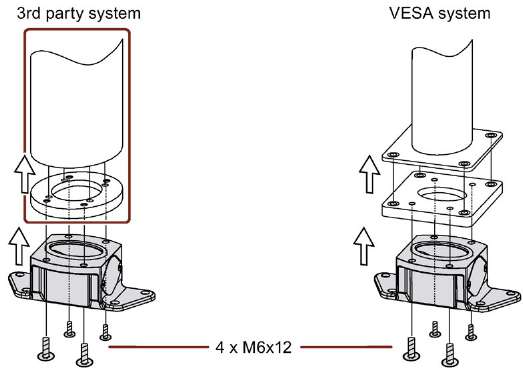
2. Attach the base adapter with 4 M6x12 screws to the mechanical interface of the support arm from below. Pay attention to the torque that is specified for the support arm.
3. Remove the screws ⑤ of the terminal compartment cover.
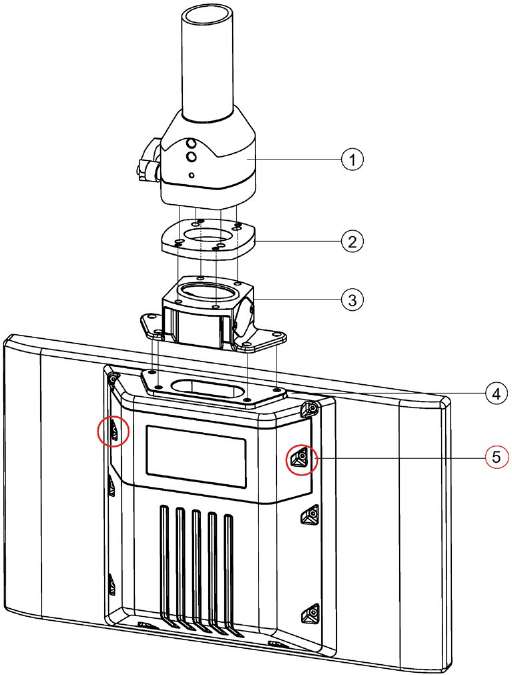
① Support arm head
② Intermediate plate
③ Base adapter
④ Countersunk head screws for device
⑤ Screws for terminal compartment cover
4. Open the terminal compartment cover ⑤ and set it aside safely.
5. Insert all connection cables through the opening of the PRO device.
Make sure that the connecting cables are not damaged.
Recommendation: Route large connectors (e.g. RS232 connectors) and their cables through the pedestal or support arm first.
6. Attach the device with 4 M4x12 countersunk head screws to the base adapter ③ from the top, torque 2.5 Nm.
Make sure that the connecting cables are not pinched.
7. Connect all cables according to the description in the section Connecting the device.
8. Fasten the cover plate ⑤ to the device with the 2 screws, torque 1.5 Nm.
Check that the seal is sitting correctly.
Prepared for support arm and extension elements (flange mount)
The following description shows an example of how to attach the PRO device to a support arm system using the optionally available Siemens flange mount ⑦. Mounting to a 48.3 mm round tube ⑧ that fits the opening of the PRO device is performed in a similar fashion.
1. Remove the screws ⑤ of the terminal compartment cover.
2. Open the terminal compartment cover and set it aside safely.
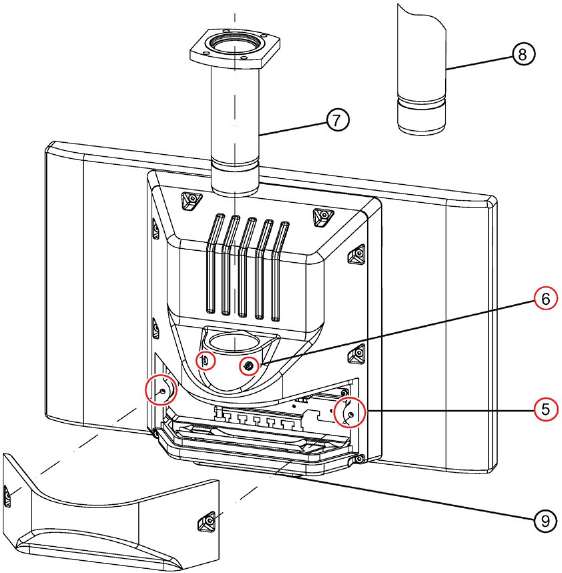
⑤ Screws for terminal compartment cover
⑥ Setscrews
⑦ Flange mount (not included in the product package; see System components
⑧ Third-party round tube (∅ 48 mm)
⑨ Cover plate
3. Grease the flange mount ⑦ or 48.3 mm round tube ⑧ with grease suitable for NBR seals, and insert the flange mount ⑦ or 48.3 mm round tube ⑧ into the corresponding opening of the PRO device.
Make sure that the sealing ring (O-ring) is not damaged. Fasten the flange mount with the 2 setscrews ⑥ M8x10 from the accessory kit.
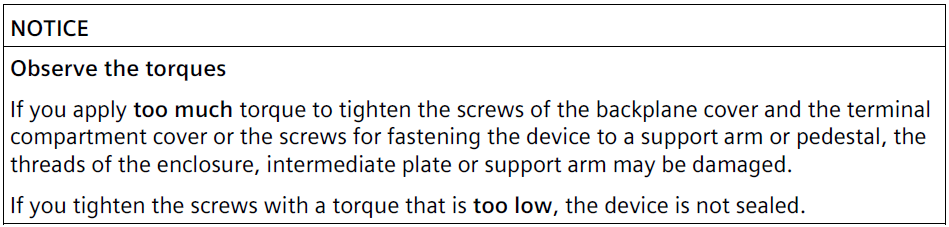
Observe the appropriate torque:
– Siemens flange mount ⑦: 8 Nm
– 48.3 mm round tube of steel ⑧: 8 Nm
– 48.3 mm round tube of aluminum ⑧: 5 Nm

4. If an adapter plate ⑨ for the Siemens flange mount is included with your support arm, attach the adapter plate to the support arm with 4 M6x12 screws. Pay attention to the torque that is specified for the support arm.
5. Insert all connection cables through the opening of the flange mount or 48.3 mm round tube into the connection compartment of the PRO device. Make sure that the connection cables are not damaged.
6. Attach the device with 4 M6 screws, 16 mm to 20 mm long, to the support arm from below.
The screws are not included in the product package of the PRO device.
Pay attention to the torque that is specified for the support arm.
Make sure that all connecting cables are fed through the flange mount into the interior of the device without damage.
7. Connect all cables according to the description in the section Connecting the device.
8. Fasten the cover plate ⑤ to the device with the 2 screws, torque 1.5 Nm. Check that the seal is sitting correctly.
9. Fasten the cover plate ⑨ from the PRO device product package with 4 M4x12 screws, torque 1.5 Nm.
Alternatively, you can extend the PRO device by adding an Extension Unit at the bottom.
Read the associated documentation.
Common misspellings:
6AV7255-6HA00-0E06AV725-6HA00-0SE0
6AV7255-6AH00-0SE0
6AV7255-6HAOO-0SE0
6AVV7255-6HA00-0SE0
- Loading...


- Phone
- *Title
- *Content
 Fast Quote
 Fast Quote
 Worldwide Shipping
 12 Months Warranty
 Customize Service
- Phone
- *Title
- *Content
