
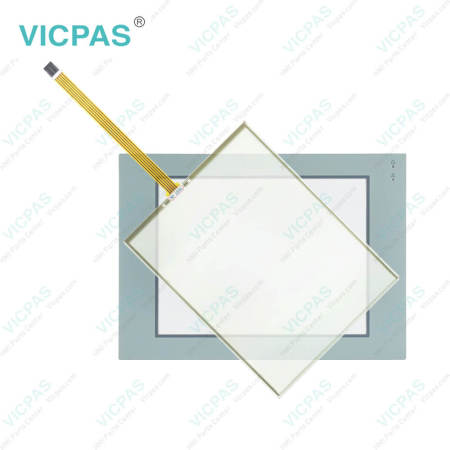
6182-CGDZBC 6182-CGDZZC 6182-DGBZZC Front Overlay Touch Glass
| Share | |
|---|---|
| Categories | 6182 6182H Industrial Computer |
| Brand | VICPAS |
| Model | 6182-CGDZBC 6182-CGDZZC 6182-DGBZZC |
| Warranty | 365 Days |
| Brand | Rockwell Automation Allen Bradley |
| Product Line | RAC6182 Industrial Computer |
| Supply | RAC6182 Industrial Computer Touchscreen Panel |
| Size | 12.1 inch |
| model | 6182-CGDZBC 6182-CGDZZC 6182-DGBZZC |
| Parts | HMI Panel Glass Front Overlay |
| Terms of Payment | Western Union, MoneyGram, T/T, Paypal, PayPal, Credit Card |
| Download |
6182-CGDZBC 6182-CGDZZC 6182-DGBZZC RAC6182 Industrial Computer Protective Films, HMI Panel Glass, and LCD Display
Order each part separately is available

VICPAS offers a range of accessories for the Allen Bradley RAC6182 Industrial Computer 6182-CGDZBC 6182-CGDZZC 6182-DGBZZC Touch Screen Glass Front Overlay HMI, including touch screens, protective films. These accessories not only enrich the functionality and options of the equipment but also provide users with comprehensive protection and operational experience. Firstly, the touch screen, as the primary operating interface, provides an intuitive and user-friendly way of operation, helping users control the equipment quickly and accurately, thus improving production efficiency. Secondly, the protective film effectively prevents the touch screen from scratches, dust, and liquid damage, extending the lifespan of the device and reducing maintenance costs. VICPAS is committed to providing customers with high-quality, reliable accessory products, ensuring long-term support for their industrial automation applications.
Furthermore, VICPAS's 6182-CGDZBC 6182-CGDZZC 6182-DGBZZC touch screen accessories are manufactured with the latest technology and high-quality materials, ensuring their stability and reliability in various industrial environments. The 6182-CGDZBC 6182-CGDZZC 6182-DGBZZC protective film equipped on the touch screen effectively prevents scratches, chemical erosion, and other damages, thus extending the device's lifespan and reducing maintenance costs.
Lastly, as a professional supplier of industrial automation accessories, VICPAS always adheres to providing customers with high-quality, highly reliable products and services. We not only offer a diverse range of accessory choices but also focus on communication and cooperation with customers to meet their personalized needs. VICPAS aims to provide reliable solutions to help customers improve production efficiency, reduce costs, and achieve sustainable success.
VICPAS supply RAC6182 Industrial Computer 6182-CGDZBC 6182-CGDZZC 6182-DGBZZC HMI Touch Screen, Front Overlay, and LCD display Screen. All of them with VICPAS 365 days warranty and support Urgent Worldwide Shipping.
Specifications:
The table below describes the parameters of the 6182-CGDZBC 6182-CGDZZC 6182-DGBZZC RAC6182 Industrial Computer Parts
| Display Color: | Amber |
| Display Size: | 12.1 inches |
| Part Number: | 6182-CGDZBC/CGDZZC/DGBZZC |
| Product Line: | RAC6182 Industrial Computer |
| Warranty: | 365 days Warranty |
| Communication: | ControlNet |
| Communication: | Ethernet and RS-232 |
| Input Type: | Touchscreen |
| Mounting Position: | vertical |
| Software: | FactoryTalk |
Related Allen Bradley RAC6182 Industrial Computer Terminals Part No. :
| Allen Bradley 6182 | Description | Inventory status |
| 6182-BGDZAC | Allen Bradley RAC6182 Series Protective Film Touch Panel Repair | In Stock |
| 6182-BGDZZC | Allen-Bradley RAC6182 HMI Front Overlay Touchscreen Replacement | In Stock |
| 6182-CGCZZC | Allen Bradley RAC6182 Series Touch Screen Protective Film Repair | Available Now |
| 6182-CGDAZC | Allen-Bradley RAC6182 Front Overlay MMI Touch Screen Replacement | In Stock |
| 6182-CGDZBC | Allen Bradley RAC6182 Series Touch Screen Glass Front Overlay Repair | Available Now |
| 6182-CGDZZC | Allen-Bradley RAC6182 Protective Film Touch Screen Panel Repair | In Stock |
| 6182-CHBABC | Allen Bradley RAC6182 Series Operator Panel Keypad Replacement | In Stock |
| 6182-CHCABC | Allen-Bradley RAC6182 HMI Membrane Switch Replacement | In Stock |
| 6182-CHDZBC Ser. A | Allen-Bradley RAC6182 Membrane Keypad Replacement | Available Now |
| 6182-CICZZC | Allen-Bradley RAC6182 Terminal Keypad Touch Screen Monitor Repair | In Stock |
| 6182-CIDAZC SER A | Allen Bradley RAC6182 Series HMI Panel Glass Keyboard Membrane Repair | Available Now |
| 6182-CIDZBC | Allen-Bradley RAC6182 Touch Digitizer Keypad Membrane Replacement | In Stock |
| 6182-DGBZZC | Allen-Bradley RAC6182 Touch Screen Panel Protective Film Repair | In Stock |
| 6182-DHDZZC | Allen-Bradley RAC6182 Membrane Switch Keypad HMI Touch Glass | Available Now |
| Allen-Bradley HMI | Description | Inventory status |
Allen Bradley 6182 Manuals PDF Download:
FAQ:
Question: How to Re-install the Operating System?
Answer:
1. Using Windows Explorer (Start Menu / Programs / Windows Explorer), open the Storage Card2 folder, which is on the PC Memory Card.
2. Copy the Bin, Platform, and Windows folders from the PC Memory Card to the Storage Card folder on the RAC6182. Use the Windows Explorer “Copy” and “Paste” commands in the Edit menu.
3. Open the Storage Card folder. Open the Platform folder.
4. Run the khinit.exe program by double-clicking on the khinit icon. This program initializes the Keypad Handler file and path in the Windows CE registry.
5. When the khinit.exe program is completed, you will be prompted to reboot the RAC6182 computer. The operating system upgrade is complete.
Question: How to disassemble the Front Bezel?
Answer: At times when repairing or replacing items on the front bezel assembly, you may need to disassemble the front bezel. You must disassemble the front bezel when you:
• Replace the front bezel plastic overlay
• Replace the vertical legend strips
To disassemble the front bezel (12.1 in. display with keypad):
1. Disconnect the keypad cable, touchscreen cable, backlight tube connectors, and the backlight power supply cable as indicated in the following figure:
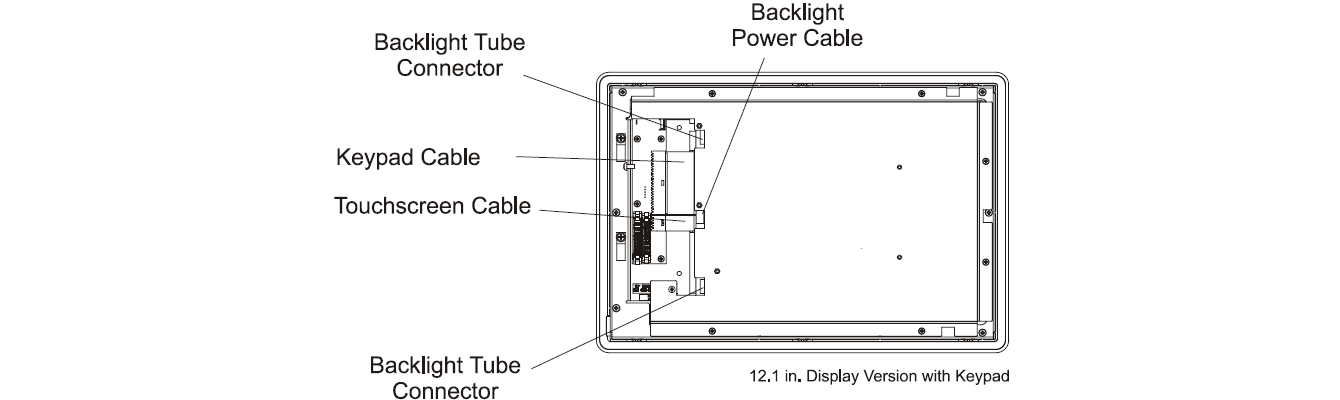
2. Remove the 6 screws securing the metal cover to the frame.

3. If you are replacing the plastic bezel overlay or vertical legend strips, remove the 10 screws securing the metal frame and lift the metal frame away from the plastic bezel.
4. To reassemble the front bezel assembly, thread the keypad and touchscreen cables through the hole in the metal frame.
5. Reconnect the keypad cable, touchscreen cable, backlight tube connectors, and backlight power supply cable.
6. If you are replacing the plastic bezel overlay or vertical legend strips, reinstall the 10 screws to attach the metal frame to the plastic overlay assembly. Tighten the screws to a torque of 6 - 8 in–lbs (0.7 - 0.9 N•m).
7. Reinstall the 6 screws to attach the metal cover to the frame. Tighten the screws to a torque of 6 - 8 in–lbs (0.7 - 0.9 N•m).
8. Follow the procedures on Page 4-2 to reassemble the front bezel assembly to the computer chassis.
To disassemble the front bezel (12.1 in. display with touchscreen):
1. Disconnect the backlight tube connectors as indicated in the following figure:
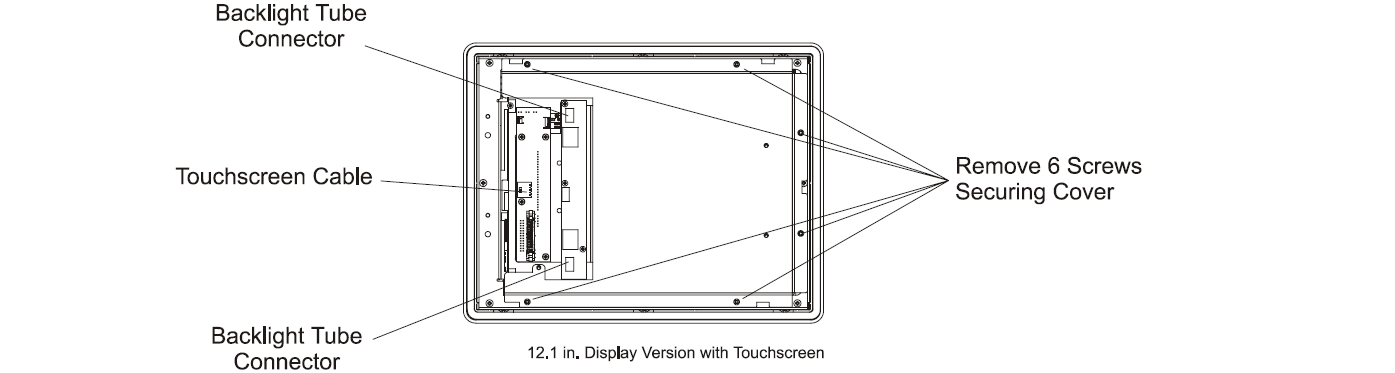
2. Remove the 6 screws securing the metal cover to the frame.
Note: The touchscreen controller board for the 12.1-in. touchscreen-only version is attached to the metal cover. Do not damage the touchscreen cable when loosening the cover.
3. Disconnect the touchscreen cable and remove the cover.
4. If you are replacing the plastic bezel overlay or vertical legend strips, remove the 10 screws securing the metal frame and lift the metal frame away from the plastic bezel.
5. To reassemble the front bezel assembly, thread the touchscreen cable through the hole in the metal frame.
6. If you are replacing the plastic bezel overlay or vertical legend strips, reinstall the 10 screws to attach the metal frame to the plastic overlay assembly. Tighten the screws to a torque of 6 - 8 in–lbs (0.7 - 0.9 N•m).
7. Replace the metal cover and reconnect the touchscreen cable.
8. Reconnect the backlight tube connectors and backlight power supply cable.
9. Reinstall the 6 screws to attach the metal cover to the metal frame. Tighten the screws to a torque of 6 - 8 in–lbs (0.7 - 0.9 N•m).
10. Follow the procedures on Page 4-2 to reassemble the front bezel assembly to the computer chassis.
Common misspellings:
6182-CGDZBC 6182-CGDZZC 6182-DGBZC
6182-CGDZBC 6182-CGZZC 6182-DGBZZC
6182-CGDZCB 6182-CGDZZC 6182-DGBZZC
6182-CGDZBC 61B2-CGDZZC 6182-DGBZZC
6182-CGDZBC 6182-CGDZZZC 6182-DGBZZC
6182-CCGDZBC 6182-CGDZZC 6182-DGBZZC
- Loading...


- Phone
- *Title
- *Content
 Fast Quote
 Fast Quote
 Worldwide Shipping
 12 Months Warranty
 Customize Service
- Phone
- *Title
- *Content
